Website staging is mostly about handling 2 or more copies of your website, typically one production and one testing (staging) instances. While your production instance services your clients, you can safely do any enhancements, amendments and testing on your staging instance.
In this article we’re not going to describe what is staging and when it’s required. For this information you can read a detailed article from WPEngine. Instead, in this article we’ll discuss how to build your own WordPress staging. Note that neither of us is a professional web developer and especially a WordPress developer.
Why to build your own staging?
We use this website as dogfooding to test Tempesta FW, so we wanted to test Tempesta against the most used web platform, which is apparently WordPress. There are many WordPress hostings providing website staging, e.g. WPEngine is one of them. So why to build our own staging instead of going with a ready to use hosting? Well, there are at least two reasons:
- the Tempesta FW wiki is generated automatically from the github repository. There is a Python daemon, which fetches all the new changes in the wiki pages, produced by all our developers, converts them from Markdown to HTML and pushes directly into the WordPress database. This custom logic could be hard to implement on a WordPress hosting.
- Tempest FW emphasizes advanced web caching techniques, so it implements unique features like purging content with immediate and light-weight population of a new content to the web cache, so we need to customize our WordPress setup to make it aware about the Tempesta FW features.
DIY staging
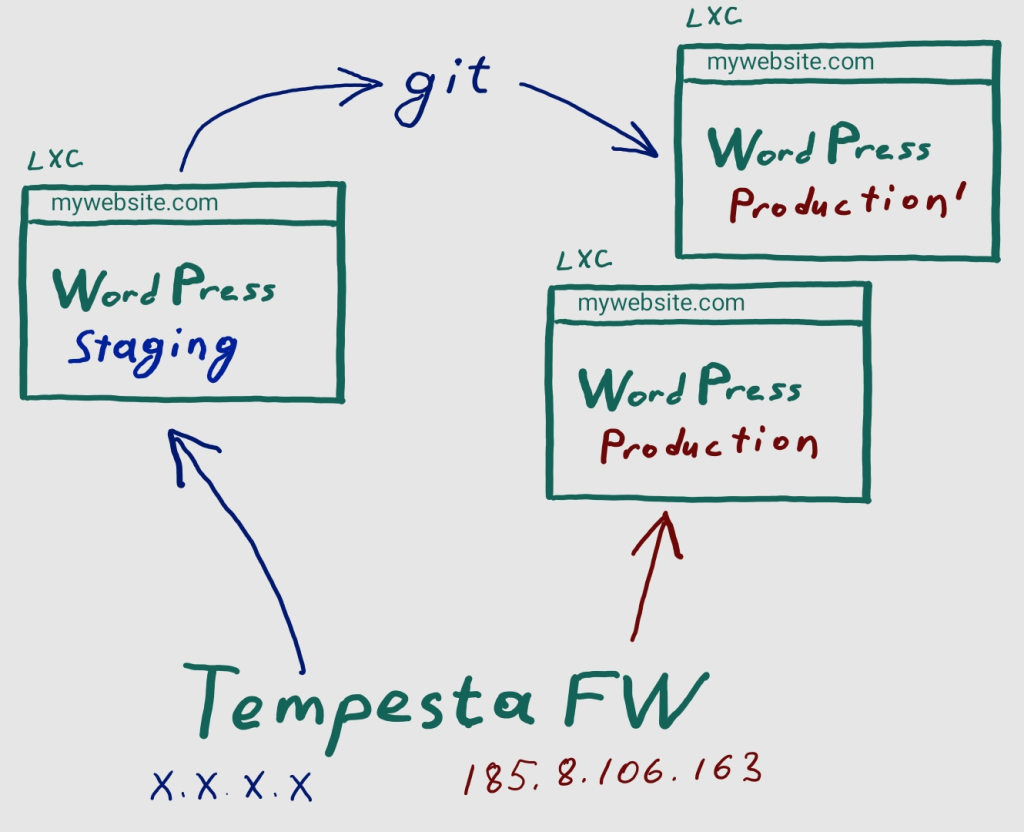
This is what we have at the moment. Further in the article we’ll discover the things from the image more, but we should start from our environment. We store the WordPress database as SQL dump, all the WordPress files and other website resources in a GitHub repository (so you see git on the scheme). Next, we deploy a website in LXC containers.
This not only about staging, but also our dogfooding: any our developer can easily deploy our website on their working computers, e.g. to debug some Tempesta FW issue, which was caught in production.
By the way, such a local website installation and be amended in any way (e.g. I write this blog post using this approach), pushed to git and deployed to a production website. This is a local staging.
Deploying containers and manual pushing changes to git aren’t for everyone, so we need a very simple staging installation on our webiste, so a web developer working with WordPress code, styles and so on don’t need need to bother with all the things. They just need to login to the WordPress admin console and do all necessary things. So we need a remote staging, hosting on the same physical server with the production website.
Being a web accelerator, Tempesta FW distributes client requests between the staging and production instances. There are 2 basic ways to deploy a staging instances and let’s have a look how to setup both the scenarios with Tempesta FW.
3rd-level domain
Traditional way to deploy a staging instance for tempesta-tech.com is to use a 3rd-level domain like staging.. This approach is taken by the most public WordPress hostings, so we started from this approach. From the Tempesta FW configuration point of view we need to write configuration like:tempesta-tech.com
srv_group default {
    server 192.168.100.4:8001;
}
srv_group staging {
    server 192.168.100.4:8002;
}
vhost tempesta-tech.com {
    proxy_pass default;
}
vhost staging.tempesta-tech.com {
    proxy_pass staging;
}
http_chain {
    host == staging.tempesta-tech.com -> staging.tempesta-tech.com;
    -> tempesta-tech.com;
}
I.e. all the requests having staging. in the tempesta-tech.comHost or :authority HTTP headers are routed to the staging instance. Here we use separate containers accepting requests on 8001 and 8002 ports. So we deployed this installation (firstly on our workstations hopefully), but we forgot about a simple, but important thing, which turned us to another staging scenario…
A web browser requests staging.mywebsite.com and Tempesta FW forward the request to WordPress container as is, i.e. having staging. in the tempesta-tech.comHost or :authority HTTP header. Obviously, WordPress is confused with the request and the website staging doesn’t work. OK, then let’s rewrite the HTTP header for staging, so for the same configuration we just have updated:
vhost staging.tempesta-tech.com {
    req_hdr_set host "tempesta-tech.com";
    proxy_pass staging;
}
So now Tempesta FW routes client requests to the staging container as tempesta-tech.com
The whole website database or even probably static files must be updated from tempesta-tech.comstaging.. But this not the only problem: we need to update all the resources back, when we deploy the changes on staging website to the production. How to update all links in all the resources for a website? The first thought was just to run some SQL statements rewriting all text sames from tempesta-tech.comtempesta-tech.comstaging.. However, the website has many articles (like this one) with URLs, which must not be rewritten. Moreover, WordPress (or its plugins) store some data in serialized arrays in the database, which require more sophisticated processing using real programming languages like Python. We’ll back to this problem bit later, at much smaller scale though. Now we moved to another approach for staging.tempesta-tech.com
Different IP addresses
The idea is very simple: both the staging and production containers work from the name of tempesta-tech.comtempesta-tech.com
srv_group default {
    server 192.168.100.4:8001;
}
srv_group staging {
    server 192.168.100.4:8002;
}
vhost mywebsite.com {
    proxy_pass default;
}
vhost staging.mywebsite.com {
    proxy_pass staging;
}
http_chain {
    mark == 1 -> staging.mywebsite.com;
    -> mywebsite.com;
}
The difference from the previous example is just that now in http_chain we route requests based on mark value received from the Linux Netfilter instead of HTTP headers. Now we only need to set the mark value based on the IP address for a client connection and we did this with:
iptables -t mangle -A PREROUTING -p tcp -d x.x.x.x -j MARK --set-mark 1Is everything done and can we launch? Unfortunately, not.
Still need database rewriting
While staging and production instances must be as similar as possible, then must not be exactly the same. The most obvious is an administrator passoword: if you provide your staging instance access to a third-party web development team, then probably you don’t want to use the same passwords for the production and staging instances. Another example could be Google Analytics – we don’t want to have all the requests, produced by a web development team, or even worse, our own stress tools, in the analytics statistics. Thus, we decided to store in our GitHub repository the staging version and update the database for production.
These database changes are localized and can be easily made by making appropriate changes in the WordPress admin console, dumping the database with mysqldump (we use MySQL) and use the diff utility to compare the dumped database with the original one. Administrator password is stored in wp_users table and can be trivially updated with one SQL statement (we just get the calculated and encoded hash of the password from the database dump).
Our website uses a plugin to send email, so we also needed to change the SMTP password. This is more tricky since this plugin stores the all SMTP settings as a single PHP serialized array like 'a:11:{s:4:"mail";a:6:{s:10:"from_email";s:20:"info@tempesta-tech.com";…'. Not so big deal though and only about 20 lines of Python code with phpserialize deserializes the string to a Python dictionary, updates the password hash, serializes back and updates the database.
Switching between production instances
On the image above you saw to production containers. Once all amendments on a staging instance are done, the WordPress database and static files are dumped to the git project directory and pushed to GitHub. Next a new production container is deployed, which takes time, but during this time the previous production container services client requests. The new container occupies a new port on local machine, so with the next step we need to make Tempesta FW to use the new container.
Actually, we store the production and staging container addresses in Tempesta FW config as a template like:
srv_group production {
    server $PRODUCTION_IP:$PRODUCTION_PORT;
}
srv_group staging {
    server $STAGING_IP:$STAGING_PORT;
}
These template variables can be easily rewritten with Python. Server groups can be dynamically updated for Tempesta FW, so no live HTTP client connections are terminated, but the new one will go to the new container. We can reload the updated configuration with:
tempesta.sh --reloadGoing live
I didn’t actually need staging to write this post (WordPress is a powerful CMS after all). But instead of conclusion, I just make an exercise and deploy this blog post from my local staging to the production website using the new approach.